
Most scenic places have unleveled grounds so levelling a motorhome is one of the essential skills RVers must learn. It’s not about just for the sake of aesthetics, but more importantly for safety. What else could be more important than that, right? So as you read through this blog post, you will learn why and how to level a motorhome.
BLOG CONTENTS
- It’s best practice for maintaining your appliances
- To keep your plumbing in good operating condition
- So passengers can be safe while moving around in your RV
- Of course, for comfort!
- Buy a self-levelling motorhome or an aftermarket self-levelling system
- Use a mobile levelling app
- Do the levelling manually
Summary on why and how to level a motorhome
Why level your motorhome?
It is innate for us human beings to know first our ‘why’ before we do things. Without knowing why levelling your motorhome is important, you surely won’t be diligent in doing it.
So again, why is it important anyway to level a motorhome?
1. It’s best practice for maintaining your appliances
When it comes to balance, your refrigerator is the most sensitive appliance there is. Why?
- In the first place, it is designed to operate on level ground. Needless to say, it must be operated on level ground as well.
- Secondly, your fridge is piped such that the compressor (located at the bottom part of the fridge) cools and pushes your cooling fluid (a.k.a. refrigerant) up to the freezer. However, at the freezer (typically) the tubing is configured in a “snakelike” manner before it flows by gravity back to the compressor.So what does this mean? It only means that disorienting your motorhome will disrupt the supposed flow of your refrigerant, leading to inefficient cooling and eventually, food spoilage.
- Lastly, and in relation to the gravity flow I just explained, it is unsafe per se. Specifically, when your motorhome is not practically level, hazardous incidents may happen depending on the direction of the slope. The first hazard is that the refrigerant may flow back to the compressor. The second is, the desired suction pressure at the compressor won’t be reached. Without getting much further on the scientific principles behind these, I believe you are now getting the idea of the level of harm these may cause you.
Pressure is a critical parameter to maintain in refrigeration systems. Given that the cooling fluid runs on a thin-walled tubing, too much pressure can easily cause leakage or worse, burst the tubing.
And don’t be shocked when your fridge door accidentally opens up on you because you parked your motorhome on uneven ground.
Kitchen (and other) appliances and cutlery are part of this too! Imagine your glassware and knives hanging or resting on a sloped surface. And your cupboard or closet doors accidentally swinging open because you parked on uneven ground. Would you not at least be concerned?
2. To keep your plumbing in good operating condition
This relates well with my previous explanation about how the cooling fluid of your refrigerator flows. That is because the case is almost the same with your motorhome’s plumbing system. Unintentional and undesired sloping will disrupt the design pressure and flow of your water or waste water pipes. That is in the form of either a backflow, overflow, underflow or even no flow.
Clogging plays a part in this as well. When you don’t level your motorhome, your solid wastes may get stuck in your pipes. And the rest is history.
3. So passengers can be safe while moving around in your RV
When your motorhome is on a sloped surface, the tendency is that it can be more susceptible to swaying or shaking. And only children find it fun to jump and move on a shaky surface. Adults should be concerned instead.
See, engineers design a motorhome’s loading capacity and balance based on a level surface. Although of course, they do conduct brake tests on sloped surfaces as well to ensure that safety standards are met. But you should not take this as a complete guarantee of your safety when you park your motorhome on a sloped surface for long.
Also, if I may remind you, elderly people are in nature highly prone to tripping and slipping. As much as they can be careful, we can’t just ignore the natural order of things. So don’t add to the likelihood of their accident due to not levelling your motorhome.
4. Of course, for comfort!
Let’s face it. Is it comfortable to move around in an uneven motorhome? What if you’re making soup or drinking coffee? How about taking a shower? Or even just the thought about sleeping on an unstable surface? How long can you sleep on a bed that is not level?
Remember that after all, you bought or rented a motorhome for comfort and convenience. So why not maximise your motorhome for its intended purpose?
How to level a motorhome
Okay so now that we know our ‘why’, let us move on to the ‘how’.
First and foremost, there are two main ways to level a motorhome. These are via manual or automatic means. Consequently, the steps on how to level a motorhome vary based on these options. So here we go:
1. Buy a self-levelling motorhome or an aftermarket self-levelling system
If you are still planning to own your own motorhome, I recommend you to buy one that already has a self-levelling system (later you’ll know why). But if you have an existing motorhome, you can purchase instead an aftermarket self-levelling system.
So what’s in a self-levelling system that it’s at the top of our options? Well, in summary, a self-levelling system does the whole work for you. It is comprised of these items:
-
-
- 4 hydraulic jacks (which act as the motorhome’s additional legs)
- Hydraulic pump
- Control system
- Hose and cables – to connect the pump, jacks and control system
-
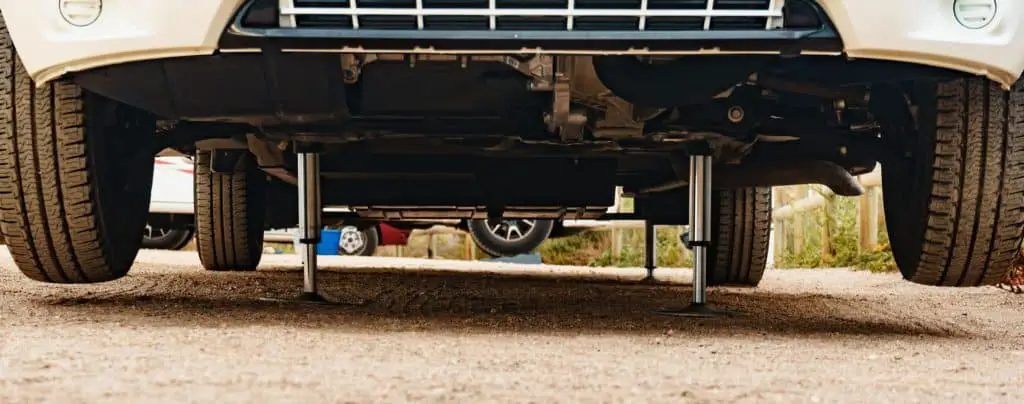
What a self-levelling system does is that it automatically adjusts your motorhome to be at the perfect level by varying the height of its four jacks. It comes with a level indicator so you can trust that this friend can do the work. All you have to do is push the appropriate button/s in your control system and after about 2 minutes, you’re good to go! Amazingly convenient, right?
Now here’s the clincher – how much does this device cost? Not cheap – a few thousand dollars! And it’s generally more expensive to buy items separately. That is why I recommended earlier acquiring a motorhome with a self-levelling system fitted in it already.
But if you ask me, I’d say buying an aftermarket self-levelling system is still worth it especially if you’re an avid RVer and one with back problems. And since it’s not cheap, be extra careful that you buy a legitimate one. The same goes with any other aftermarket product you buy – for instance, RV seats. Here are some tips to get you by:
Tips when buying self-levelling systems
Compatibility
Self-levelling systems are typically designed to be compatible with all RVs. Although this is the case, it doesn’t hurt to personally confirm first with the supplier if their product is compatible with the model and weight of your RV.
Brand
Well when I say brand, I’m not referring to the name only. Rather, what makes the name of that brand? What sets it apart from other suppliers?
Country of Origin
Unless made for export to Australia, imported self-levelling systems may have their own standards which are not uniform with the Australian standards. It may seem to be a minor thing, but it’s not. Some imported devices may be cheaper, but not necessarily safe.
Marking / Certifications
Do your due diligence in looking for evidence that the product is indeed safe for use. A default standard to look for is the CE marking. But to give you precise benchmark Australian standards to compare with, visit Product Safety Australia’s guidelines.
Warranty
This is quite a given no matter what the product is. Usually, standard warranties for such a product are approximately 12 to 24 months.
Aftersales
Even if you’re purchasing from a local supplier, it is still important for the seller to have a good record of after-sales service so you won’t be left hanging in the air in case you encounter a product problem.
Complete Accessories
It is a common problem among buyers to discover too late that the product they bought is not actually complete. For example, accessories are sold separately or as “optional” items. Finding out that you can’t use your device because of a missing puzzle piece is a great inconvenience. So, exert a little effort into confirming if the product comes as a complete package. Definitely look for the Owner’s manual too.
2. Use a mobile levelling app
In case you’re still saving up for a good self-levelling device, you can settle for the meantime with a mobile levelling application. There are several free apps to choose from. Naturally, choose the one with the best reviews and customer ratings. But here’s how to use them:
-
- Acquire levelling ramps, blocks or a manual jack first.
- Download the app from the Apple Store or on Google Play on your mobile phone.
- Fill up the vehicle details required by the app. For instance, vehicle weight, tyre details, and others.
- Place your mobile phone on a level surface inside your motorhome (say, on a table).
- Your app will show you how much you should ramp up on each wheel.
- Place your ramps per the requirements shown by the app. Some ramps are graduated, so those types are a bit more helpful in general.
- Drive up to the ramps and check in the app if your motorhome is now level. If not, readjust your ramps and re-check until you get it right.
Now there are paid mobile levelling apps that come with customised ramps or blocks. This will make things a bit easier for you since the adjustments to be requested by the app will now be more aligned with the graduations of the custom ramp or block.
3. Do the levelling manually
Come on, would you still want to go down this path? But let’s say you aren’t that technically savvy to handle option 2, or you just naturally prefer the manual way of doing things.
What you will need here is a spirit level (see image below), a manual jack or 4 levelling ramps or blocks, powerful eyesight, and a lot of patience.

The steps are pretty much the same as those for the mobile app. The only difference is that instead of using an app, you will be using a spirit level.
Okay, so how do we know if the spirit level shows a perfectly balanced motorhome? That is if the air bubble is perfectly centred between the two vertical marks. Simple, right? But I’m telling you it’s not that easy. That is why I’ve warned you earlier that you’ll need a long string of patience for this levelling method.
Anyhow, if you’re a newbie RVer, I advise that you start learning using a free mobile app in option 2 above. That way, you will master the art of estimation quicker.
Alright, so that wraps up our ‘how’. That is unless you want to go further down the manual road of using stones as levelling blocks! As rustic as it may seem to be (which grey nomads might think as “cool”), I personally wouldn’t recommend that. Be concerned enough for your safety.
Summary on why and how to level a motorhome
After all, that’s said in this blog post, I trust that somehow you have learned some pointers and tips on levelling motorhomes. Again, it all boils down to the saying “safety first”. RVers need to learn how to properly level their RVs both for safety and convenience. As to “how to level a motorhome”, you may use a:
- A self-levelling system that comes with automated jacks, or
- A mobile levelling app (free or paid) which may come with their own levelling ramps, blocks or even sensor, or
- A spirit level accompanied with separately bought manual jack, levelling ramps, or levelling blocks